Once
upon a time, not so long before the video-games era, people needed the
command-line and knowledge of esoteric commands like _examine_,
_look_, _take_, _drop_, _go south_ etc. to
get into the mysterious worlds of dungeons &
dragons. If you have nostalgia to the heroic times of text-based
adventure games (nowadays called IF for _interactive fiction_),
there is a short message : get Inform(ed)! Here’s a
slightly longer message for those who have a mac running OSX and want to
know the quickest way to get to a screen like 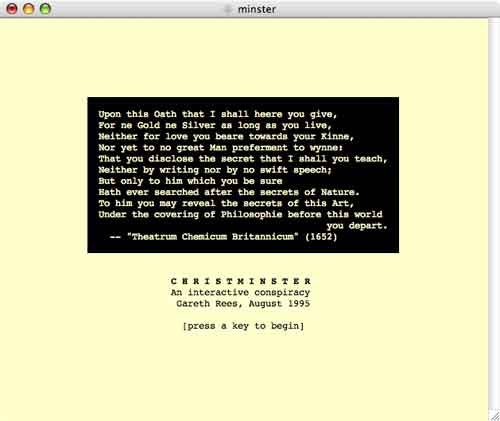 and start
playing Christminster (or another of 300 IF-games) (if you’re on a
different system, things will be just as simple but you’ll have to find
it out yourself starting from the Inform-Z
machine page). step 1 : Get a
copy of an inform installation and expand it to get an
Inform-folder and place this in your Home-folder. step 2
: Go in the Finder to Inform/Games/MyGame1 and double click on
the _MyGame1.command_ file. A Terminal window will open and exit
and you will see that a new file appeared in the Folder :
_MyGame1.z5_. Double click it and a warning message will appear
that this is the first time you will open _Zoom_, tell it’s ok
and Zoom will launch and you can play your first (though primitive)
Inform game! step 3 : If you want to play other
games (such as Christminster), go to the Z-
code archive and pick one of the 346 games. For example, click on
the minster.z5 link and the file will download to your
Desktop. Place it in the Inform/Games folder (not necessary) double
click it and you should see the above wellcoming message. That’s it,
start playing. step 4 : If you don’t know how to
play such games, there are excellent tutorials
available on the Inform site.
Tag: OSX
Clearly, someone who
subscribed to your brain shouldn’t have to check the arXiv every morning only to find out
that you still haven’t posted _the_ paper s(h)e is expecting of
you, based on your recent BrainActivity…
So why not
package this into your Brain subscription? It is easy enough to get all
posts by a specific author from the archive but, unfortunately, the
arXiv doesn’t provide RSS-feeds of this information (at least, not to my
knowledge). Still, it is possible to fix this with a tiny
Perl-script.
So copy the code and adjust it replacing MyInfo
by Yours (or sligthly safer, get the arxivpost.pl
file as I had to add a few spaces to get it un-parsed) and safe it
somewhere on your system.
So how to put this to use? Btw. I know
that all of you know this by heart and that I may have given you the
(false, i swear) illusion to be fairly knowledgeable writing a
Perl-script in half an hour, but believe me, in two months (and sooner
when it’s up to me) I will have completely eradicated all this
techie-stuff from MyBrain. Then, it will take me infinitely longer to
remember/reconstruct things than it will take me now to blog this here,
so please either bear with me or go somewhere more interesting.
You’d better have Perl installed on your system, but then you have to
install extra modules from CPAN the
Comprehensive Perl Archive Network (this is to Perl what CTAN is to TeX for the mathematicians
among us). That’s pretty easy if you remember the correct commands. The
generic way to do this is by firing up your Terminal and typing things
like
 iBookLieven:~ lieven$ sudo perl -MCPAN -e shell
Password:  cpan shell -- CPAN exploration and modules installation
(v1.83) ReadLine support enabled  cpan> install Template::Extract
and similarly for the other modules you’ll need,
LWP::Simple and XML::RSS. You may be asked questions but just go for the
default. If something goes wrong and you get a message that the module
failed to install, you have to go for a manual override…
Go to CPAN and do a search on the module’s name. You’ll
be given a list op files to download, go for the one you need and
download the souce somewhere. Then, again in Terminal do the following
routine
- cd to the downloaded and extracted directory
- perl Makefile.PL
- make
- make test
- sudo make install
Even if the test fails with
certain errors, just go ahead (it will not matter for the trivial uses
we have for these modules) and the last command is Mac OSX only (I’m
pretty certain that Linux-fanatics know what to do instead and for
Windows-diehards, well….).
Having all modules installed
you can execute the file with
perl arxivpost.pl
(assuming you created the Directory in which the program
is supposed to safe the arxivXXX.rdf file and assuming you made it
writable). That’s it. You now have your own RSS feeds of all your papers
on the arXiv which you should make for of YourBrain subscription).
Just one more thing you should do. Make this a cron
job. Check at what local time the arXiv puts online the new papers
of the day (assume it is 3am) then do a sudo crontab -e
and then add a line to the file as
 5 3 * * Mon-Fri perl

/pathtowhereitis/arxivpost.pl
and your subscribers will
only have to wait 5 minutes to know whether you did it…(or not).
You can check it out either by subscribing to MyBrain or subscribing to
http://www.
neverendingbooks.org/FOAF/arxivLLB.rdf.
 If I
If I
ever get our home automation system configured I’ll use my (partly
broken) old iBook as my Indigo-server (or my MisterHouse-server when I brush up my
Perl-knowledge). It should then run quietly put away somewhere and I
don’t want to take it out every time I want to add another routine to
the program.
Fortunately there is a way to do this by turning
the iBook into a VNC-server, where VNC stands for
Virtual Network Computer. Here is how RealVNC describes
it
VNC (Virtual Network Computing) software makes it
possible to view and fully-interact with one computer from any other
computer or mobile device anywhere on the Internet. VNC software is
cross-platform, allowing remote control between different types of
computer. For ultimate simplicity, there is even a Java viewer, so that
any desktop can be controlled remotely from within a browser without
having to install software.
But can all this be done under
Mac OS X without too much hassle? The first step is to download
OSXvnc and install it on the iBook. Some of the
sourceforge-sites do not seem to have this package, but fortunately some
still do. Installation is no problem and when you fire OSXvnc up
you have to fill in a password which you need later to connect to your
OSXvnc-server (the iBook). Most other options one can leave at their
default values but in the Startup-pane it is useful to click on
the Configure Startup Item button. When all this is done, press
the Start button to launch the VNC-server.
Next step is
to go to the computer you want to use to control the VNC-server (an iMac
in my case). On it one needs to install the Chicken of the VNC software which makes the iMac
into a VNC-client. Fire it up and fill out the Host (the name of
your OSXvnc-server, iBookLieven.local in my case) and the
Password (the one of the OSXvnc-server program), press the
Connect button and the screen of your VNC-server will appear
which you can control with your mouse as if you were actually working on
the thing. Very handy as I managed to break the touch-control on my
iBook when installing a new hard-drive and I need the only USB-port to
connect to the X10-network…