 More
More
than a month ago I started a long term project trying to make the best
of our little home network. The first couple of weeks I managed to get
iTunes, iPhoto and iMovie-files flowing from any computer to the living
room (the TV-set for photo and mpeg-files and squeezebox for audio files). The last couple of weeks I
have been making my hands dirty with some hard-ware upgrades. The key
problem being that some of our Macs have a too small hard disk for
present day needs. For example, PD2 could no longer play The Sims (and
their never ending extensions) on her 6 Gb iMac, so one day she simply
decided to get rid off most things in het Applications-folder, a
desperate cry for attention. Together with Jan I took our two 6 Gb
slot-loading iMacs apart and replaced them by a 120 Gb resp. 80 Gb hard
disk, giving the Sims ample virtual space to expand (I hope). Beginning
of this week I finished the slightly more daunting task of upgrading an
original 4 Gb front-loading iMac to a performing 120 Gb potential
Server. But I knew that the worst part was still to come : my old
(colored) iBook was making so much noise that I didn’t use it anymore
for anything demanding some kind of concentration (like writing papers).
So I wanted to replace the old 6 Gb noisy disk with a silent Hitachi
2.5 HDD 20GB 5400RPM ATA100 8Mb Cache-hard disk. However I did read
the instructions and was a bit put off by this.
Luckily, I had to wait because I didn’t have the appropriate material.
Whereas any super-market sells Torx- 10 and 15 screwdrivers, I needed an
8 or 9. Eventually I found one in a good shop (they even have torx 6 and
7, it seems you need those to take your mobile apart), so no more
excuses. Tuesday afternoon I had a first try but already between stage 2
and 3 of the instructions I cut an essential connection (for the
trackpad)… and quickly assembled everything again (I could still use
my iBook with a USB-mouse…). This morning, when the rest of my family
left at 8 o’clock, I had another go (btw. never try to do this unless
you can afford to loose your iBook). The whole process is pretty scary :
you have to take out your keyboard, modem, CD-player, display and a few
minor ingredients before you get at the hard-disk. At the time you do,
the whole table is filled with parts and several cups containing some
screws which you will hopefully remember to put back in the correct
place. Still, in less than two hours I managed to replace the harddisk
and put everything back together (I lost some tome because at the end
one needs to remove some bolts and I didnt have a good tool available so
I had to improvise). I didn’t expect anything when I powered up the
iBook but somehow it reacted ok, I could start up from a System9 CD and
initialize the harddisk and even put System9 on it, but there was
something strange : all message-windows appeared at the lower right hand
side of the display… When I did restart from the HD, it became
apparent that I lost about 30% of my screen, including the part where
one normally sees the HD, CDs etc., so I had a small problem. But, after
my success of conquering my hard-ware phobia, I was not alarmed, I
cycled to the university and had a chat with Jan about it. He suggested
zapping the PRAM which I did in the afternoon, without any effect
on my partial display. So, perhaps it was a hard-ware thing after all
and I had to take my iBook apart again until I got at the connections
for the display (which is step 6 out of 8 of the instructions). Then,
the problem became clear : in reassembling the display-connectors I had
used a bit too much force so that some of the spikes were bend. But,
after repairing this and closing up the iBook again, the problem was
solved. So I have now a 20 Gb iBook with a nice quiet harddisk and I
“only” lost my trackpad and sound in the process… a good deal I
would say.
Category: web
 For
For
someone as clumsy as me, it is no real surprise to loose one in three
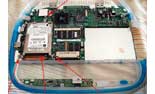
hard disks, but what happened yesterday was a bit puzzling at first. I
tried to replace the original 4 Gb hard disk of an original iMac (a tray
loading iMac) following the instructions of the MacWorld : how to upgrade an iMac-page I used last
time together with Jan to replace two hard disks in slot-loading iMacs.
The whole process is a bit scary : unplug 4 connections, remove the
motherboard, remove the CD-driver in order to get at the hard disk, but
to my own surprise I managed to do all this fairly quickly and replaced
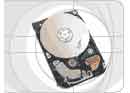
the hard disk by a 120 Gb Seagate Barracuda hard disk. I
put the iMac back together and started up from the OS 9 CD (last time I
forgot this and it is becoming fairly impossible to get a working
System9 defacto on 10.3). I opened DiskUtility and to my surprise the
utility found the new disk, so I managed to install everything properly.
I could even initialize and partition the disk (to run OS X on a first
generation iMac one needs to install it on a partition which is no
larger than 8 Gb) in two partitions (one 8Gb, the other the rest) and
installed System9 on the first partition. So far, so good but when I
restarted the iMac, a blinking question-mark appeared on the screen
indicating that it could not find the installed System9! Then I tried to
start-up from the 10.3-installation disk, started up the DiskUtility and
this time it found no hard disk at all. So I started up again from the
System9 CD and the two partitions appeared on my Desktop, seemingly in
perfect order. What was going on? There was an hard disk, I put System9
on one of its partitions but somehow it refused to find it, and starting
from the 10.3 CD it looked as if there was no hard disk whatsoever. If
you are knowledgeable, you know already where the problem was situated
but as I am more a software than a hardware guy I looked for similar
problems on the net and found an entry in which the solution was
obtained by installing System9 on the larger partition. So I tried this,
but again met the same problems.
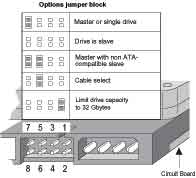
So it must be a
hardware problem and I downloaded the product manual and began browsing through it until
I found one of these marvelous computer-terms : the master-slave
jumper settings. Who invents this kind of terminology? The
master-slave jumper… Anyway, here are the possibilities for a
Barracuda
 I
I
admit I didn’t look at the jumper-setting when I inserted the hard
disk. The previous two times it was not necessary and I assumed that the
default position would be the master-setting but wasn’t certain. Hence,
there was only one way to find out and that was redoing the whole
replacement-process… So, this morning I did this and found out that
the jumper-settings were set at Cable select which according to
Geert is the best setting for Windows-computers as
they then automatically decide whether to use the disk as master or
slave, so perhaps for Seagate there is some marketing logic in choosing
this as their default setting. Hence, I changed the setting to
master, quickly put back the iMac and in the end discovered that
I was left with two screws… As they must have been the screws
connecting the hard-disk cage to the motherboard I had little choice but
to redo the whole process a third time. Surprisingly, I began to like
the whole procedure, one should be forced as a computer-user to take
your computer apart a couple of time before working on it. Finally, I
tried to install OS X again, the DiskUtility recognized the two
partitions without any problem and the installation went smoothly.
Probably System9 can find a Cable-select connected hard disk, whereas OS
X cannot…
 The
The
GAP-package is very good in working with finite
fields or Abelian extensions of the Rational numbers, but sooner or
later we will need to use the coordinate ring or function field of an
affine variety for which it is hopeless. On the other hand, there is an
excellent free package to do these calculations : Singular.
So, the ideal situation for us would be to be able to access Singular
from within GAP. Fortunately, Marco Costantini and Willem de
Graaf have written such an interface. Here is how to get in working
under OS X : One has to download two files from the Singular Mac OS X download page :
Singular-2-0-4-ppcMac-darwin.tar.gz and
Singular-2-0-4-share.tar.gz. Once they are on your desktop you
can follow the instructions on the INSTALL.html file in the 2-0-4
Folder of the expanded Singular-2-0-4-ppcMac-darwin. Keep the
tarred version and open the INSTALL-file in your browser (to be
able to copy and paste) and open up the Terminal. Do the analog
thing to
cd /usr/local sudo tar -pxf
/Users/lieven/Desktop/Singular-2-0-4-ppcMac-darwin.tar sudo tar -pxf
/Users/lieven/Desktop/Singular-2-0-4-share.tar
Then
follow the instructions making the symbolic links and you have Singular
working. The next step is to go to the GAP Packages page and go to the
package Singular for full documentation.
To use Singular in a GAP-session, here is an example
gap>
LoadPackage("singular");
The GAP interface to Singular
true
gap> StartSingular();
I  Started Singular (version 2004)
gap> SetInfoLevel( InfoSingular, 2 );
gap> G:= SymmetricGroup( 3 );;
gap> R:= PolynomialRing( GF(2), 3 );;
gap> GeneratorsOfInvariantRing( R, G );
[ x_1 x_2 x_3, x_1*x_2 x_1*x_3 x_2*x_3, x_1*x_2*x_3 ]
gap> I:= Ideal( R, last );;
gap>GroebnerBasis( I );
I  running GroebnerBasis... I  done
GroebnerBasis. [ x_1 x_2 x_3, x_2^2 x_2*x_3 x_3^2, x_3^3 ]
gap>
Leave a Comment